Scheduled Posts

X Ads allow you to schedule both organic and Promoted-only Posts to go live at a specific date and time. You can schedule Posts within your ads account, up to a year in advance, and add them to new and existing campaigns. This feature is great for Posts that need to be published on weekends, evenings, or other busy times when you don't have time to Post manually.
Watch this video for an overview on how to schedule organic and Promoted-only Posts:
How to create scheduled Posts
1. Log in to ads.x.com.
2. Navigate to the "Creatives" > "Posts" tab.
3. Click on "New Post" in the top right corner.
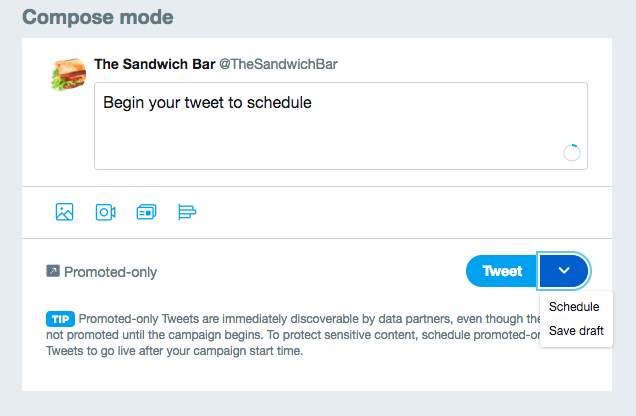
- You'll be redirected to the Post Composer, where you can create your Post. Add your copy, photos, videos, and cards here.
4. Choose "Promoted-only" or not. Selecting "Promoted-only" will deliver your Post only to users targeted in a Promoted Ads campaign, not organically to your followers. Unselecting this will schedule an organic Post.
- You can only unselect "Promoted-only" when logged into your ads account.
5. Once you're finished, select the down arrow button next to "Post".
6. Choose "Schedule" from the drop-down menu.
7. Select the date and time you want your scheduled Post to go live.
Your Post won't be discoverable on X or by any data partners until the date and time you scheduled.


Don't see the "Creatives" tab in your Ads Account? Scroll down to the FAQ at the bottom of this page for more information.
How to manage scheduled Posts
- Log in to ads.x.com.
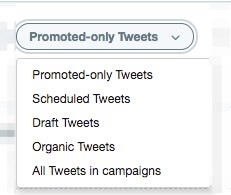
- Navigate to the "Creatives" > "Posts" tab. Here you can view and create Promoted-only, scheduled, organic, or all Posts in your campaigns.
- To view your scheduled Posts, toggle the drop-down button that says "Promoted-only Posts" and change it to "Scheduled Posts". You will now see all Posts that are currently scheduled. All management, including editing and deletion of scheduled Posts, can be done here.
- To edit your scheduled Post, hover over the Post and click "Edit" on the lower left corner. Here you can edit your Post, delivery, promotion, and scheduling details. Click "Update scheduled Post" to save your changes.
- To delete a scheduled Post, click on the three dots at the top right corner of the Post and click "Delete" from the drop-down menu.
- To add or remove your scheduled Post from campaigns, check the box next to the Post and click "Add to campaigns". Select or remove the campaigns you'd like, and save.


Frequently asked questions
I can't find my "Creatives" tab
If you don't see the "Creatives", "Campaigns", or "Tools" tabs, this is likely because your account doesn't have a credit card on file. The "Creatives" tab and Post scheduling will appear after entering a credit card, but there is no spend required when you add a credit card.
After adding a credit card, you will have access to all cards, conversion tracking, custom audiences, and the ability to schedule and manage Posts through the “Creatives” tab.
What timestamp will my Post have when it goes live?
Your scheduled Post will go live at the date and time you specified. Your new live Post will have the timestamp of that specified time.
Why does the Post ID change after the Post goes live?
When you create a scheduled Post, that Post is not yet live, meaning it doesn't appear anywhere in X (except for your ads account). We give scheduled Post "Scheduled Post IDs" before they go live, so that our systems have a record of them. When your Post goes live at your specified date and time, it will be given a new Post ID, just as all Posts on X have.
Why can't I find my scheduled Post in my campaign dashboard?
Scheduled Posts will only appear in your Ads Manager once the Post has gone live at the scheduled date and time you set.
Ready to get started?
